PC Maintenance
How to Apply Thermal Paste: Fix CPU Throttling and FPS Drops in CS2 & Valorant
If your gaming PC is more than 12–18 months old and you've never reapplied thermal paste, dried factory compound is likely causing severe CPU throttling and sudden FPS drops in CS2 and Valorant. This step-by-step guide shows you exactly how to apply thermal paste correctly to fix CPU throttling, eliminate FPS drops, choose budget compounds under $10, and drop temperatures by 6–15°C in under 20 minutes.
- 8 min read
Why Old Thermal Paste Destroys Your FPS in CS2 & Valorant
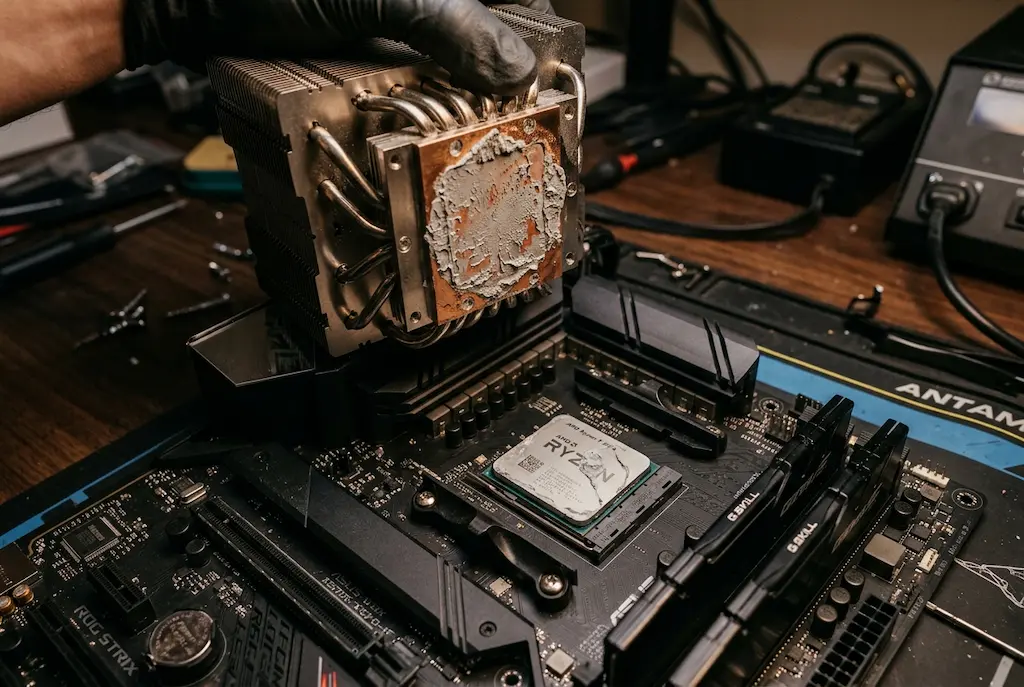
CS2 and Valorant are both extremely CPU-bound games. Counter-Strike 2 runs on the Source 2 engine with aggressive single-threaded game logic: your frame time is dominated by CPU latency on one or two cores. Valorant's Unreal Engine 4 implementation similarly creates heavy single-core load spikes during key game events — spike planting, ability activation, flashbang detonations.
When your CPU overheats, Intel and AMD both respond identically: the processor drops its Turbo Boost multiplier to reduce heat output. This CPU throttling happens in milliseconds, mid-frame. The result is not a gradual slowdown — it triggers sudden, sharp FPS drops and frame-time spikes that appear as a stutter or freeze in your crosshair movement at exactly the worst moment: a clutch 1v1, a spray-down through smoke, or a close-range duel where reaction time is everything.
The root cause is almost always thermal paste degradation. Factory-applied compound on budget coolers and OEM builds is often a low-grade silicone-based paste that dries, cracks, and delaminates within 12–24 months of use. Once dried, it can no longer fill the microscopic surface imperfections between the CPU IHS (heat spreader) and the cooler's copper or nickel base plate — those microscopic air gaps act as near-perfect thermal insulators. Temperatures that were 65°C under load at build time can climb to 85–95°C on the same hardware a year later, with zero hardware changes.
Reapplying quality thermal compound restores the thermal interface to factory-fresh or better performance, typically reducing temperatures by 6–15°C, eliminating CPU throttling, and fixing unexplained FPS drops throughout entire gaming sessions.
Types of Thermal Interface Materials: What to Use and What to Avoid
Not all thermal compounds are equal, and for budget PC builders the choice of material type matters more than chasing the highest thermal conductivity number. Here is what you actually need to know before buying anything.
Metal Oxide / Carbon-Based Paste
Best for 99% of Users
Standard thermal compounds based on zinc oxide, aluminum oxide, or carbon nano-particles suspended in a silicone or polymer carrier. Completely non-electrically-conductive (dielectric), so accidental contact with capacitors or socket contacts near the IHS edge carries zero risk of shorts. Viscosity ranges from thick (easy to apply with a spatula) to thin (ideal for the pea method). Performance: 4–13 W/m·K thermal conductivity. This is what Arctic MX-4, Thermalright TF8, and Noctua NT-H1 all are — and they are what you should use.
Best picks in this category:
- Arctic MX-4 / MX-6 — industry standard, never dries, 8+ year service life
- Thermalright TF8 — 13.8 W/m·K at a budget price, exceptional value
- Noctua NT-H1 / NT-H2 — premium viscosity, zero cure time needed
Liquid Metal (Gallium Alloy)
Expert Only — High Risk
Compounds like Thermal Grizzly Conductonaut or Kryonaut Extreme use gallium-indium alloys with thermal conductivity of 70–80 W/m·K — roughly 10× better than standard paste. However, gallium alloys are electrically conductive and will corrode aluminum on contact. On AM4/AM5 sockets, liquid metal applied carelessly can bridge solder contacts causing instant CPU damage. It also dissolves the nickel plating on some cooler bases over time. Liquid metal belongs only on delided CPUs for direct-die application by experienced builders. Do not use it if you are asking how to apply thermal paste.
Who should avoid it:
- Anyone using an aluminum cooler base (gallium corrodes aluminum)
- AM4 / AM5 socket users without experience in deliding
- Laptop users (liquid metal can seep into components)
Phase-Change Thermal Pads (PTM7950)
Premium Alternative
Pads like Honeywell PTM7950 are solid at room temperature but become liquid at 45°C, filling surface imperfections as the CPU heats up. They offer thermal conductivity near 7–9 W/m·K with zero application mess — just cut to size and place. They are slightly less optimal than MX-6 or TF8 for peak delta-T but eliminate any re-application or pump-out concerns over years. A valid choice for those who want a set-and-forget upgrade.
Best for:
- Users who want zero-mess one-time application
- Small form factor builds where paste overflow is a concern
- Laptop repasting where the paste pad is thicker than typical CPU pads
The Under-$15 Shopping List: What to Buy on Amazon
Everything you need to do this job properly costs under $15 total. Do not let a hardware store or PC shop charge you $40 in labor for a 20-minute job.
Arctic MX-4 or MX-6 Thermal Compound (~$7 – $9)
Top Pick for Beginners
The global default recommendation for a reason: non-conductive, non-corrosive, never cures fully so it never cracks or dries out, and performs excellently on all mainstream sockets (AM4, AM5, LGA1700, LGA1851). A single 4g tube covers 15–20 applications. MX-6 provides a 6% improvement over MX-4 if you can find it at the same price.
Why it wins:
- No cure time — performance is at maximum from first boot
- Non-conductive — safe even if you get some on the socket area
- 8+ year rated service life — won't need reapplication for years
Thermalright TF8 Thermal Compound (~$8 – $10)
Best Thermal Performance per Dollar
TF8 delivers a rated thermal conductivity of 13.8 W/m·K at a price point that competes with basic compounds. In independent benchmarks and hardware review tests, it consistently outperforms Arctic MX-4 by 2–4°C under sustained all-core load, making it the preferred choice for players running CPU-heavy overclocks or locked high-TDP CPUs. Slightly thicker consistency than MX-4 — works best spread thin with a spatula.
Best for:
- Intel Core i5-13600K / i5-14600K and above (high sustained TDP)
- AMD Ryzen 9 7900X / 7950X (high all-core consumption)
- Anyone with an aftermarket tower cooler wanting max delta-T reduction
Noctua NT-H1 or NT-H2 Thermal Compound (~$7 – $9)
Best-in-Class Viscosity
NT-H1 has a uniquely balanced viscosity that makes the pea method foolproof — the compound spreads evenly under cooler pressure without being too runny to apply or too thick to compress. NT-H2 adds a 10% performance improvement at the same price. Both are standard choices among system integrators for a reason: clean application, no cure time, and excellent long-term stability.
Includes:
- 3× cleaning wipes and 1× application spatula in most retail packs
- Zero cure time — no break-in period required
Silicone Spatula / Paste Spreader Set (~$4 – $6)
For the Spatula Method
A small set of silicone or hard plastic applicator spatulas lets you spread a very thin, uniform layer of compound across the entire IHS surface — ideal for Intel LGA1700's elongated die, AMD's AM5 rectangular IHS, and any large direct-die application. Much more consistent results than using a finger or a card.
What to look for:
- Flexible silicone tip — won't scratch the nickel-plated IHS
- Handle length at least 8cm for good leverage inside a PC case
99% IPA Prep Pads or ArctiClean Kit (~$5 – $8)
Mandatory — Don't Skip
Removing old thermal paste is not optional. Applying new compound over a layer of dried old paste adds a thermal resistance layer that will make your temperatures worse than before you started. 99% isopropyl alcohol prep pads remove most standard pastes cleanly. For stubborn or hardened compound (common on 3+ year old builds), the ArctiClean two-bottle kit (Step 1 dissolves, Step 2 degreases) removes even baked-on paste in minutes without scratching the IHS.
Options:
- 99% IPA Prep Pads — cheap, widely available, works on most pastes
- ArctiClean Thermal Remover + Surface Purifier — for old or hardened paste
* As an Amazon Associate I earn from qualifying purchases.
Application Methods: Pea, Cross, or Spatula?
The application method you should use depends on your CPU socket type and the shape of the die beneath the IHS. Using the wrong method won't necessarily damage anything, but it can leave large uncovered areas or waste compound.
Pea Method (Rice-Grain Center Dot)
Best for Beginners — Works on Any Socket
Apply a single small dot of paste — roughly the size of a grain of rice or a small pea (3–4mm diameter) — directly in the center of the IHS. When the cooler base presses down, the compound spreads outward under pressure and covers the die area naturally. This is the method recommended by Arctic, Noctua, and most cooler manufacturers because it minimizes air bubble entrapment and works correctly on square IHS designs (AM4, AM5, LGA1200, older LGA1151).
Recommended for:
- AMD AM4 (Ryzen 3000 / 5000 series) — square IHS, pea method is ideal
- AMD AM5 (Ryzen 7000 / 8000 / 9000 series) — center pea works well
- Intel LGA1200 / LGA1151 — square-ish die layout, pea is fine
- First-time builders who want a reliable method
X-Pattern / Cross Method
Best for Intel LGA1700 / LGA1851
Draw a thin X or plus-sign (+) pattern across the IHS surface with the syringe tip. This pre-distributes paste across the four die quadrants before the cooler is mounted, giving more consistent initial coverage on Intel's LGA1700 and LGA1851 sockets — which use a distinctly elongated, rectangular IHS. In practice the performance delta between pea and X methods is minimal with proper cooler pressure, but many builders prefer the X-pattern on these sockets for peace of mind.
Recommended for:
- Intel Core i5/i7/i9 12th Gen (Alder Lake) — LGA1700 elongated IHS
- Intel Core i5/i7/i9 13th/14th Gen (Raptor Lake) — same socket
- Intel Core Ultra 200 series (Arrow Lake) — LGA1851
Spatula Spread (Thin Uniform Layer)
Best for Maximum Coverage & Large IHS
Apply a small amount of paste to the center of the IHS, then use a silicone or plastic spreader to manually distribute it across the entire surface in a very thin, uniform layer — thin enough that the metallic surface slightly shows through. This eliminates all gaps and provides 100% theoretical coverage, making it the preferred method for high-end cooler installations, direct-die (delidded) applications, and any situation where you want absolute consistency. Requires a separate spreader tool.
Best for:
- Delidded CPUs (direct-die application to the bare silicon)
- Large IHS designs (Threadripper, HEDT, some AM5 SKUs)
- Builders with a spreader tool who want maximum consistency
Step-by-Step: How to Repaste Your CPU in Under 20 Minutes
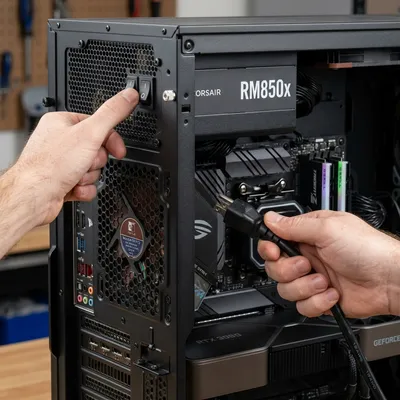
1Shut Down and Disconnect — Fully
Before touching any components:
• Power Off: Shut down Windows, flip the PSU rear switch, and unplug from wall.
• Discharge: Press the case power button once to discharge residual capacitors.
• Grounding: Remove side panel and touch bare metal chassis to ground yourself against ESD.
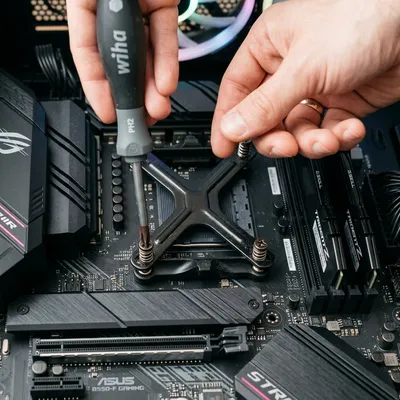
2Loosen Cooler Screws in a Diagonal Pattern
Use a Phillips PH2 screwdriver to loosen screws:
• Diagonal Order: Loosen in an X-pattern (top-left → bottom-right → top-right → bottom-left) a half-turn at a time.
• Break Seal: Once loose, gently twist cooler left/right before lifting up.
On AM4, if CPU sticks to cooler: lower it back into socket carefully — never pull laterally while stuck.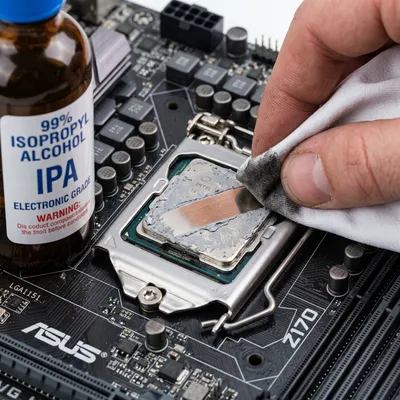
3Remove Old Paste from Both Surfaces
Clean both CPU IHS and cooler base:
• Dry Wipe: Remove bulk paste with a dry microfiber cloth.
• 99% IPA Wipe: Clean in straight lines with 99% IPA prep pad until metal is shiny.
• Dry Time: Let both surfaces air-dry for 60 seconds.
Never use rubbing alcohol below 90%, hand sanitizer, or acetone (acetone can damage plastic cooler brackets).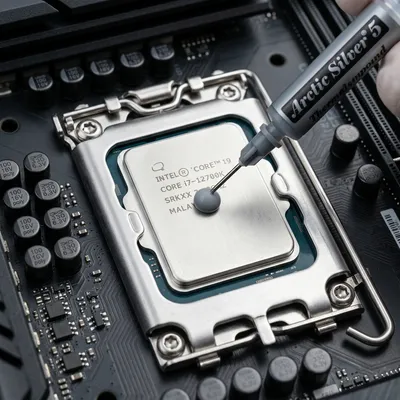
4Apply Your Chosen Paste
Apply paste depending on socket:
• Pea Method (AM4/AM5/LGA1200): Single center dot (~3–4mm diameter, size of a rice grain).
• Spatula Spread: Spread extremely thin, uniform layer across entire IHS.
More is not better: excess paste squeezes out under pressure and insulates instead of conducting.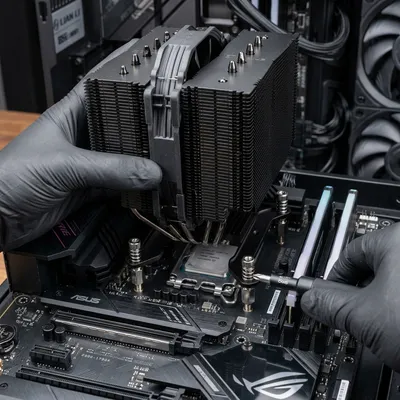
5Mount the Cooler — Diagonal, Even Pressure
Mount cooler evenly:
• Lower Straight Down: Avoid sliding laterally to prevent air bubbles.
• Tighten Diagonally: Screw in X-pattern, a quarter-turn at a time, until firm resistance is met.
6Stress Test and Verify Temperatures
Verify installation with test:
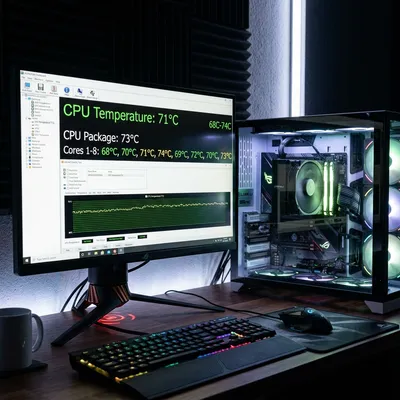
• Software: Open HWiNFO64 and run Prime95 Small FFTs for 10 minutes.
• Target Temps: Peak load under 80°C (tower cooler) or under 90°C (stock cooler).
Synthetic load temps (75–85°C in Prime95) drop to 60–70°C in real CS2/Valorant games.
What Replacing Thermal Paste Delivers for CS2 & Valorant
6–15°C Lower CPU Temperatures
Independent measurements consistently show a 6–15°C drop in peak CPU temperature after replacing degraded factory paste with quality compound. The exact delta depends on how badly the old paste had dried: year-old standard paste might yield 6–8°C, while 2–3 year old dried paste on a budget box cooler can produce 12–15°C improvements.
Stable Turbo Boost — Stop CPU Throttling and FPS Drops
With temperatures kept under the CPU's thermal junction limit (AMD AM4: 95°C, AMD AM5: 89–95°C depending on SKU, Intel mainstream: 100°C), your processor never triggers CPU throttling to shed heat. In CS2 and Valorant terms, this directly eliminates mid-fight FPS drops and stabilizes 1% Low frame rates when reaction time matters most.
Better System Longevity
Running a processor at 90–95°C daily for extended periods significantly accelerates electromigration in the silicon and degrades solder joints on the CPU package over time. Keeping temperatures in a healthy 60–75°C gaming range through fresh thermal compound and proper mounting adds measurable years to the operational lifespan of your CPU and motherboard.
Frequently Asked Questions
For a desktop tower CPU with an aftermarket air or AIO liquid cooler and quality compound like Arctic MX-4 or Noctua NT-H1, every 2–3 years is a reasonable guideline under normal gaming use. High-TDP processors (AMD Ryzen 9 X3D series, Intel Core i7/i9 K SKUs) that run consistently hot benefit from annual reapplication. Laptops dry out faster — typically every 1–2 years due to smaller heatsinks, higher thermal cycling stress, and thinner paste volumes.
Yes, significantly. The goal is to fill the microscopic surface imperfections between the IHS and cooler base with the absolute minimum amount of paste needed to eliminate air gaps — not to create a thick insulating layer of compound. A pea-dot of 3–4mm diameter is the correct starting amount for the center-dot method. After mounting, this should spread to cover approximately the die area underneath. Excess paste that squeezes out to the IHS edges does not improve thermal performance — it just creates a mess and risks contaminating LGA socket contacts on Intel platforms.
No. Toothpaste and food-based compounds have thermal conductivity of around 0.3–0.5 W/m·K — roughly 10–20× worse than proper paste — and contain acids and water that corrode the IHS and cooler base. Vodka is only 40% alcohol and leaves water residue and mineral deposits that reduce thermal conductivity and can cause corrosion over time. 99% isopropyl alcohol is the only safe solvent for cleaning old paste. For the paste itself, Arctic MX-4 costs $7 on Amazon — there is no scenario where any food substitute is a rational choice.
Intel and AMD stock box coolers both come with a pre-applied thermal interface material on the cooler base — a thin gray film or pad. This pre-applied compound is generally adequate for normal stock operation but is often lower quality than aftermarket paste. If you are installing a brand-new box cooler for the first time, you can use the pre-applied material. However, if you are upgrading to any aftermarket cooler, or re-mounting after any removal, you must clean the cooler base and apply fresh paste — the pre-applied material is designed for one-time use only.
For a standard gaming build with the CPU IHS intact, no. The performance delta between top-tier standard paste (TF8, MX-6) and liquid metal is typically 3–6°C — meaningful in an extreme overclock context, but negligible for CS2 or Valorant FPS. The risk profile of liquid metal (electrically conductive, corrodes aluminum, irreversible if it seeps into socket) is simply not justified for a gaming machine. Liquid metal belongs in high-end enthusiast delid builds, not general gaming PCs.
Yes, and it often produces even more dramatic temperature improvements than desktops — laptops have smaller heatsinks, shorter thermal paths, and more frequent thermal cycling that degrades paste faster. However, laptop repasting is significantly more complex: most require removing 8–20+ screws, disconnecting multiple ribbon cables, and navigating tight tolerances. Some models use thermal pads instead of paste on the GPU or voltage regulator modules, which must be replaced with equivalent-thickness pads, not paste. Research your specific laptop model on iFixit or YouTube before attempting it.
You May Also Like
- Gaming Eye Strain Prevention Guide 2026: Monitor Settings, Lighting & Habits
- How to Install an NVMe SSD: Step-by-Step Guide for Beginners
- CS2 FPS Boost Guide 2026: Best Settings for Max Performance
- Best Ultra-Budget 240Hz Monitors Under $120 for CS2 & Valorant (2026)
- Best Ultra-Budget 144Hz Monitors Under $80 for CS2 & Valorant (2026)