Low-Cost Mod
High LOD Tape Trick: How to Fix Sensor Lift-Off Distance on Budget Mice
When playing CS2 or Valorant on low sensitivity, you constantly lift and reposition your mouse to recenter on the pad. On budget gaming mice with PixArt PMW3325, PMW3327, or Instant A725 sensors, the factory Lift-Off Distance (LOD) is often around 1.5–3.0mm depending on the mouse implementation. This causes your crosshair to twitch and throw off your crosshair placement every time you lift. Here is how to bring your LOD down toward esports-grade levels (roughly 1mm) using a strip of tape — for the cost of the tape itself, with a small tradeoff in max tracking speed.
- 6 min read
Why High Lift-Off Distance Destroys Your Aim in CS2 & Valorant
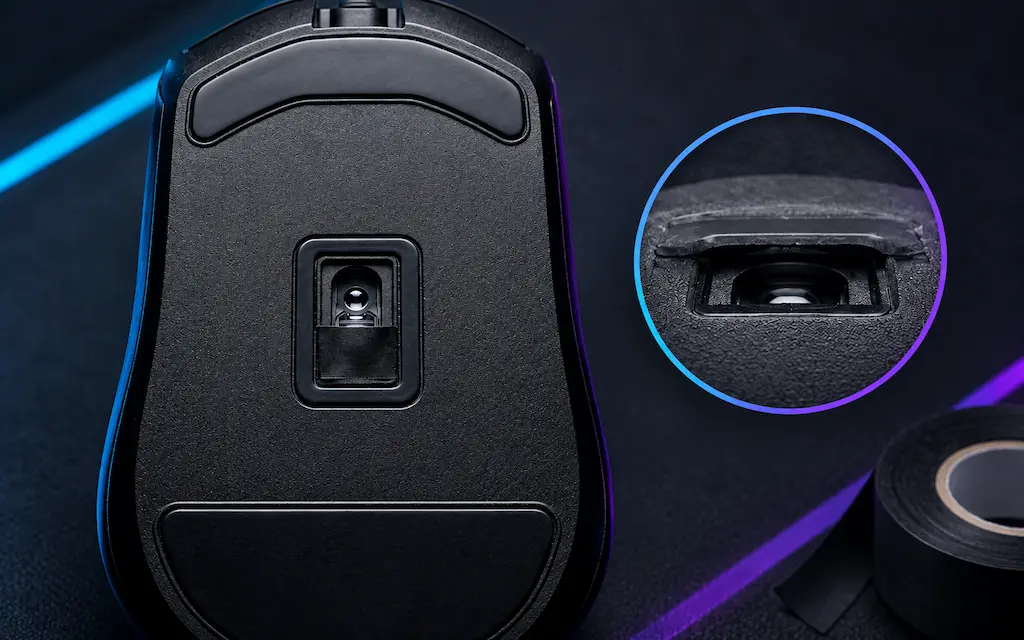
In tactical first-person shooters like Counter-Strike 2 and Valorant, mechanical consistency and crosshair placement decide rounds. Most competitive players run low sensitivity (400–800 eDPI in CS2, 200–400 eDPI in Valorant) to achieve millimeter-accurate micro-corrections and recoil control. At these sensitivities, a full 180-degree turn requires sweeping across 25 to 40 centimeters of your mousepad.
Consequently, you must constantly perform 'lift-and-reset' cycles: swiping towards an angle, quickly lifting the mouse off the pad, and repositioning it in the center.
Here lies the fatal flaw of ultra-budget gaming mice: excessive Lift-Off Distance (LOD).
LOD is the exact height above the mousepad at which the optical sensor stops reading surface motion. Flagship esports mice (like the Logitech G Pro X Superlight, Razer Viper V3 Pro, or Zowie series) typically offer a software-selectable Low LOD mode that brings lift-off cutoff to around 1.0mm or below — because their sensors expose a firmware-level LOD register. Without this Low LOD mode enabled, even flagship mice can measure 1.0–1.5mm.
Budget mice equipped with entry-level sensors — such as the PixArt PMW3325, PMW3327, or Instant A725 — routinely measure a factory LOD of roughly 1.5mm to 3.0mm depending on the specific implementation, and typically have no software LOD control at all. As you lift your mouse, the sensor keeps tracking through thin air for an extra fraction of a second. As your hand arches up and down, this airborne tracking translates into jitter, unwanted horizontal drift, or crosshair kick. When you touch down, your crosshair is no longer locked onto the enemy's head — it has shifted noticeably off-target.
The 1-Minute DVD Test: Measuring Your Sensor's Real LOD
Before modifying anything, you should benchmark your mouse's actual lift-off distance. You do not need precision digital calipers — a couple of standard optical discs (CDs or DVDs) give an exact measurement.
1 Disc Test (~1.2 mm)
Esports Standard
A standard CD or DVD is precisely 1.2mm thick. Place one disc under the rear skates of your mouse while the front rests on the mousepad. Attempt to move your cursor.
Pass criteria:
- Cursor should freeze or produce zero tracking movement.
- If the cursor still tracks smoothly, your LOD exceeds 1.2mm.
2 Discs Test (~2.4 mm)
Problematic for Tactical FPS
Stack two discs under your mouse skates (2.4mm combined thickness). If your mouse cursor still tracks movement while elevated on two discs, your mouse has a critically high LOD.
Expected behavior on budget sensors:
- PixArt 3325 / 3327: Commonly tracks through roughly 2 discs (~2.4mm) in independent measurements.
- Instant A725: Typically measures ~2.0–2.2mm — most units stop at or just before 2 discs, though results vary by mousepad surface.
- High risk of crosshair wobble during fast resets in CS2 and Valorant.
The Optical Physics: Why the Tape Trick Works
To lower LOD without software, you do not need to rewrite microcontroller firmware. You only need to manipulate how light from the sensor's illuminator reaches the surface.
An optical mouse sensor operates like a high-speed camera paired with a dedicated illumination source (an infrared or red LED). On most budget sensors, the LED shines through a single angled lens/prism assembly onto the weave of your mousepad, and the same optical path returns the reflected image to the CMOS sensor array, which calculates movement deltas from the shifting micro-shadows of the fabric thousands of times per second.
Budget sensors are designed with wide-angle lenses and high depth of field so they can track reliably across uneven surfaces, cheap plastic desks, or rough mousepads without calibration. However, this deep depth of field allows the sensor to keep registering reflected light even when held several millimeters above the pad.
The Tape Trick works by placing an opaque mask over part of that light path. The tape blocks a portion of the light coming from the LED, which shortens the window during a lift in which the LED still "sees" a spot on the surface. By physically reducing the illuminated area, you shrink the height at which the sensor can still register enough contrast to track. The moment you lift the mouse past roughly 1.0–1.5mm (depending on tape placement and mousepad surface), illumination drops below the sensor's tracking threshold, and tracking stops.
This comes with a real tradeoff: reducing how much light reaches the sensor can also reduce its maximum reliable tracking speed. Applied conservatively, most users don't notice this in normal play — but it's a physical compromise, not just a risk of "doing it wrong," so always re-test max-speed tracking after applying the mod (see the calibration section below).
The $2 Mod Kit: Choosing the Right Tape & Materials
Not all tapes work for this sensor modification. Budget optical mice use high-intensity red LED or infrared illumination that easily penetrates semi-transparent office Scotch tape, clear packing tape, or thin paper painter's tape. If stray light bleeds through, your lift-off distance will not drop. You need a completely opaque, non-reflective material that adheres flush beneath your mouse skates without leaving sticky residue.
Black Vinyl Electrical Tape (PVC) (~$2 - $4)
The Gold Standard
Standard black PVC electrical tape is the undisputed king of sensor tape mods. It provides 100% optical opacity against both visible red and infrared wavelengths, flexes easily into the sensor opening bezel, and peels off cleanly with minimal residue.
Recommended Brands:
- 3M Scotch Super 33+ Vinyl Tape
- Generic Black PVC Electrical Tape
Matte Black Masking / Console Tape (~$4 - $6)
Zero-Residue Alternative
Dense, paper-based black tape commonly used on film and audio equipment. Its matte micro-textured surface eliminates specular internal light bounce, cuts with surgical precision using a craft knife, and leaves zero sticky residue on mouse plastic even after months of use.
Recommended Brands:
- ProTapes Pro Artist Black Tape
- Black Flatback Paper Masking Tape
Precision Craft Knife & Alcohol Prep Pads (~$3 - $5)
For Clean Application
Cutting a micro-strip with dull scissors results in frayed adhesive edges that catch on cloth mousepads and ruin your glide. An inexpensive craft knife ensures razor-sharp 2mm strips, while alcohol prep pads ensure the tape adheres securely beneath the skate level.
Recommended Tools:
- X-Acto #11 Precision Craft Knife
- 70% Isopropyl Alcohol Prep Pads
* As an Amazon Associate I earn from qualifying purchases.
Step-by-Step: How to Apply the Tape Mod
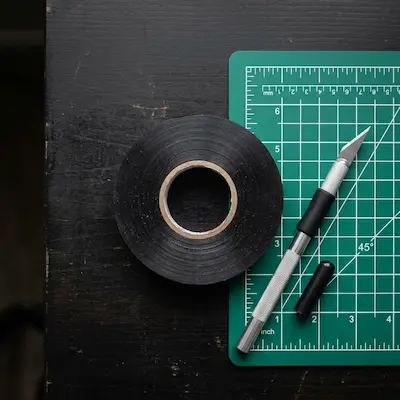
1Choose the Correct Tape Material
Always use standard black vinyl electrical tape (PVC) or matte masking tape. Avoid clear cellophane tape, office Scotch tape, or thin paper tape: infrared and high-intensity LED light can easily penetrate semi-transparent materials, rendering the mod ineffective. Black electrical tape is opaque, flexible, and leaves minimal residue when replaced.
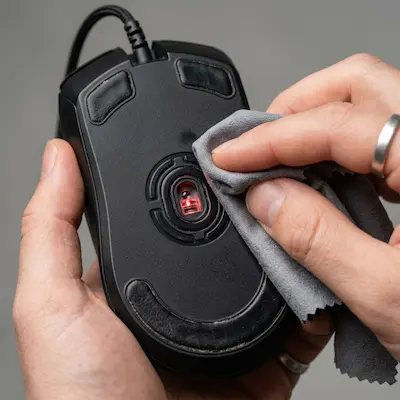
2Clean the Sensor Aperture Area
Unplug your mouse or turn off the power switch. Take a microfiber cloth with a drop of isopropyl alcohol and thoroughly clean the plastic surrounding the sensor hole on the bottom shell. Remove all dust, hair, and hand oils so the adhesive bonds securely and will not shift during gameplay.
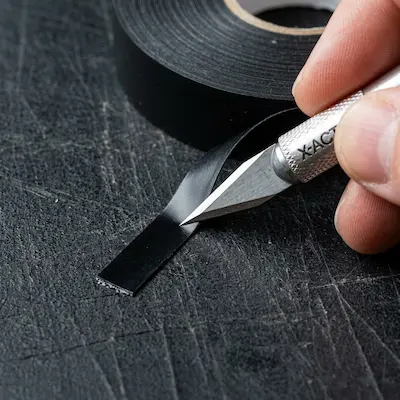
3Cut a Precision 2mm–3mm Strip
Using sharp scissors or an X-Acto craft knife, cut a clean rectangular strip of electrical tape roughly 2mm to 3mm wide and 8mm long. Precision matters: you want straight edges without frayed adhesive threads that could catch on your mousepad fabric.
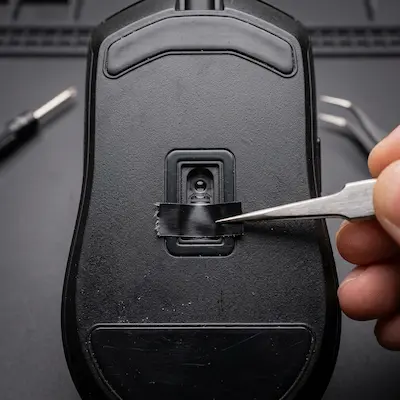
4Align the Tape Over the Edge of the Sensor Window
Look into the sensor window on the underside of your mouse. Depending on the mouse, the LED illumination and the camera lens may share a single window, or you may see a visibly separate glow toward one edge of the opening when the mouse is powered — that's the LED side. Apply the strip over that outer edge of the opening, working inward gradually. Never cover the center of the window, where the actual imaging happens.
If you cover too much of the opening or encroach on the center of the lens, the mouse will stop tracking altogether or suffer from spin-outs during fast flicks.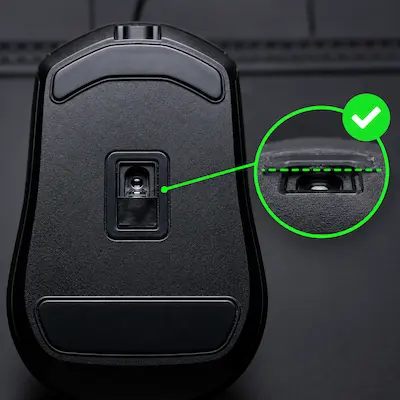
5Burnish Flush and Check Clearance
Press the tape firmly against the plastic recess using the flat end of a toothpick or a fingernail. Ensure the tape sits completely recessed below the plane of your PTFE mouse skates. The tape must never rub against the mousepad fabric, as friction will cause scratching and slow down your glide.
Testing and Calibrating: Preventing Spin-Outs
Once the tape is applied, you must verify tracking integrity before jumping into competitive ranked matches. A properly applied tape mod gives a crisp, low LOD while keeping max-speed tracking usable — but this requires deliberate testing, not just a one-time application.
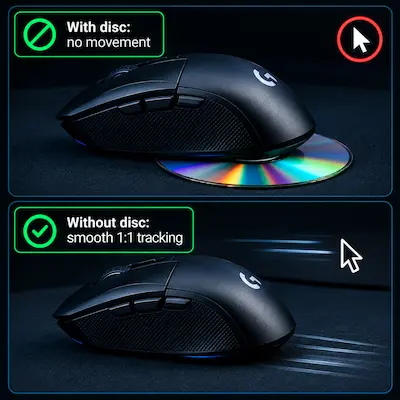
1Re-Run the 1-Disc Test
Place a single CD/DVD under the rear of your mouse. Attempt to move the mouse. The cursor should now remain completely motionless. Remove the disc and glide the mouse on the bare pad: cursor movement must be perfectly smooth and 1:1 with zero hesitation.
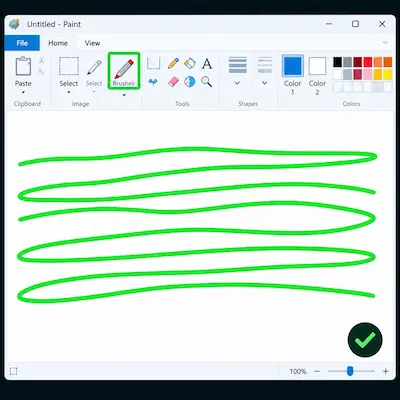
2The MS Paint / MouseTester Swipe Test
Open MS Paint or MouseTester. Select the pencil tool. Perform aggressive, high-speed swipes (simulating 180° panic flicks in CS2 or Valorant) across the entire width of your mousepad. The drawn lines should be continuous, smooth, and free of sudden dips, breaks, or straight vertical lines (which indicate sensor spin-out). This step specifically checks for the max-tracking-speed tradeoff mentioned earlier — it's not optional.
If your cursor freezes during high-speed swipes or randomly teleports to the ground, your tape strip is covering slightly too much of the sensor opening, starving it of light during high-speed motion. Peel it back by 0.5mm and retest.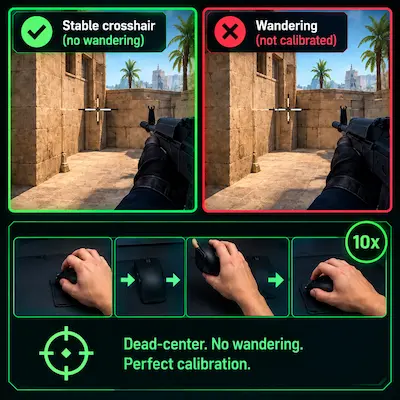
3In-Game Reset Check (Deathmatch)
Hop into a CS2 or Valorant Deathmatch server. Place your crosshair on a corner angle (e.g., Mirage A-ramp or Ascent B-main). Lift your mouse 10 times consecutively, recentering it on your mousepad after each lift. If your crosshair stays dead-center on the corner angle without wandering, your mod is calibrated to perfection.
What This Low-Cost Mod Delivers for CS2 & Valorant
Rock-Solid Crosshair Placement
When holding pre-aim angles or executing tactical peeks, lifting your mouse to reset arm positioning no longer shifts your crosshair. You retain exact pixel alignment, allowing instantaneous first-bullet accuracy the millisecond an enemy peeks.
Consistent Spray Transfers & Re-Centering
During extended firefights requiring mouse recentering on small budget pads, a lower LOD helps the sensor shut down cleanly mid-air. You reduce unpredictable recoil kicks and erratic vertical cursor drift caused by the sensor tracking your hand arc.
Closer to Flagship Lift-Off Behavior on a Budget Mouse
By reducing the sensor's effective light-gathering area at height, budget mice running PixArt 3325, 3327, or Instant A725 chips can get much closer to the sharp lift-off cutoff characteristic of pricier flagship peripherals — at the cost of some maximum tracking speed headroom, which most low-to-mid sensitivity players won't notice.
Frequently Asked Questions
No. The tape is applied externally to the outer plastic casing of the mouse shell. It makes zero electrical contact with internal components and does not alter firmware. The modification is fully reversible in a few seconds by simply peeling the tape off and wiping any residual adhesive with an alcohol pad.
Yes — this is a real tradeoff, not just a risk of doing it wrong. Blocking part of the sensor's light path can lower its maximum reliable tracking speed, since the sensor has less light to work with during fast motion. For most low and mid sensitivity players this isn't noticeable, but very high-speed flick players may feel some skipping at maximum swipe speed. Always run the swipe test in the calibration section after applying tape, and back off the tape slightly if you see any spin-out.
Optical gaming sensors operate using intense infrared or red spectrum light. Standard office Scotch tape and thin blue painter's tape are partially translucent to these wavelengths, allowing stray light to scatter through the tape and reducing the effectiveness of the cutoff. Black vinyl electrical tape is dense, opaque, and flexible enough to seal flat against the shell.
You generally don't need the tape trick on modern high-end sensors — PixArt PAW3370, PAW3395, or PAW3950, or Logitech's proprietary HERO 25K. These flagship sensors already expose LOD tuning directly in their companion software (G HUB, Synapse, etc.), letting you dial in a Low LOD mode that brings cutoff close to or under 1.0mm. Applying tape on top of software LOD control is unnecessary and more likely to cause tracking problems than help.
Results vary more by mousepad than most guides admit. Solid, finely woven cloth pads tend to give the most predictable cutoff. Highly reflective surfaces, some hard/glass pads, or heavily textured and multi-colored low-contrast cloth pads can make the effect inconsistent or require noticeably more trial-and-error tape positioning — and on some pad/sensor combinations, users report the trick barely working at all. Treat the calibration steps as mandatory whenever you switch pads, not just a one-time setup.
Spin-out (where the crosshair violently flies to the sky or floor during fast swipes) means the tape is starving the sensor of light during high-speed motion — usually because it's encroaching too far toward the center of the sensor window. Use tweezers or a knife to trim back the tape by approximately 0.5mm so more light enters, then re-run the MS Paint swipe test.
You May Also Like
- Mouse Grip Tape: Are Cheap Anti-Slip Stickers Worth It for CS2 & Valorant?
- DIY Mousepad Deep Clean: Revive Your Muddy Pad for Perfect Glide
- Best Ultra-Budget Gaming Mousepads Under $5 for CS2 & Valorant (2026)
- Valorant Mouse Settings Guide 2026: DPI, eDPI & Sensitivity Explained
- CS2 Mouse Settings Guide 2026: DPI, eDPI & Sensitivity Explained