Modding Guide
How to Lube Mechanical Keyboard Switches: From Scratchy to Smooth
Does every keystroke sound like dragging sandpaper? That scratchy, gritty feel isn't a sign your keyboard is broken — it's a sign the switches were never lubed at the factory. A single bottle of lube fixes it completely in an afternoon.
- 7 min read
Why Factory Switches Feel Scratchy
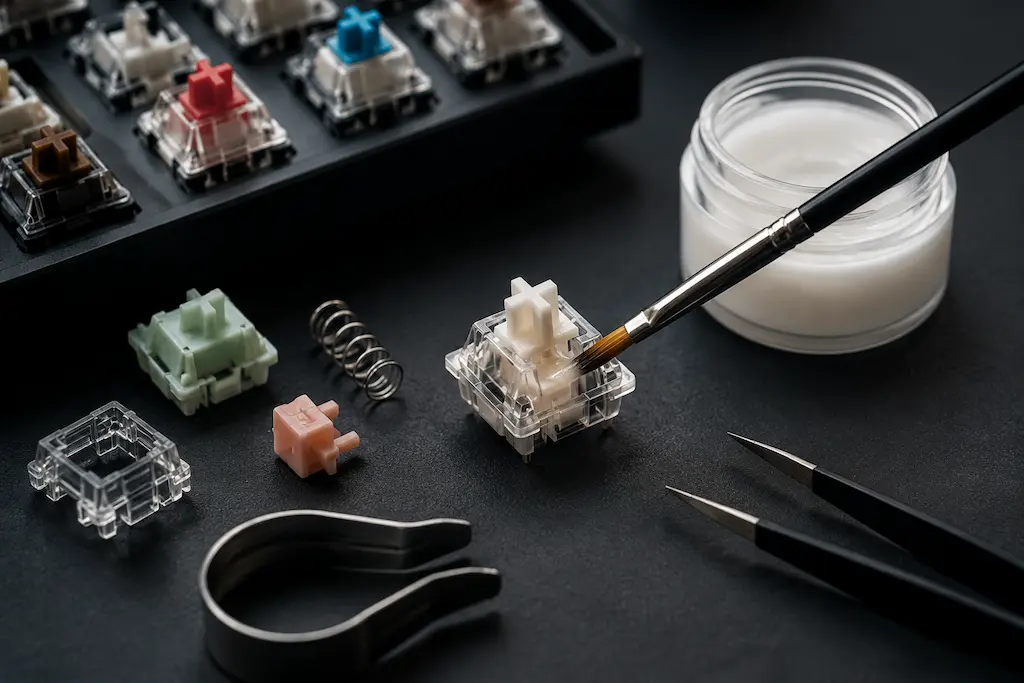
If you want to learn how to lube mechanical keyboard switches, this full DIY guide is for you. We will show you how to fix scratchy, loud mechanical keyboard switches with the correct lube, taking your keyboard from scratchy to smooth. Every mechanical switch consists of several plastic parts sliding against each other thousands of times a day: the stem pushes down through the housing, the legs flex against the housing rails, and the spring oscillates with every keystroke. Budget keyboard manufacturers ship switches completely dry — no lubrication whatsoever. The result is audible, tactile friction: a harsh scratchy sound on every keystroke, spring ping on fast typing, and a gritty resistance that makes long gaming or typing sessions genuinely fatiguing. The fix isn't buying a new keyboard. A simple bottle of the correct lubricant, applied with a small brush in an afternoon, transforms the feel from sandpaper to butter. This step-by-step guide on choosing Krytox 205g0 vs Tribosys 3204, tools, and technique will help you eliminate switch friction completely.
Choosing the Right Lube: Krytox 205g0 vs Tribosys 3204
The most common beginner mistake is choosing the wrong lubricant. Standard greases like WD-40, petroleum jelly, or thick bicycle grease will destroy your switches — they eat the plastic, migrate into the spring contacts, and make the problem worse. You need switch-specific PFPE-based lubricants. The choice between the two industry standards comes down entirely to your switch type. Using a thick lube on tactile switches muffles the bump — the defining characteristic of the switch — turning a satisfying clicky or tactile experience into a mushy linear. Always match lube viscosity to switch type for the best lube for keyboard switches result.
Krytox GPL 205 Grade 0 (Thick)
Best for Linear Switches
The gold standard for linear switches like Cherry MX Red, Gateron Yellow, or any budget linear. Its thick grease consistency completely eliminates housing rail friction and spring ping, producing a deep, satisfying 'thocky' smooth keystroke with zero scratch.
Recommended for:
- Cherry MX Red / Black / Speed Silver
- Gateron Red / Yellow / Black
- Any budget linear switches
Tribosys 3204 (Thin)
Best for Tactile Switches
A thinner lubricant that reduces housing friction and eliminates spring ping while preserving the tactile bump on switches like Cherry MX Brown, Gateron Brown, or Holy Pandas. Applying 205g0 to tactile switches completely destroys their bump — 3204 keeps it intact.
Recommended for:
- Cherry MX Brown / Clear
- Gateron Brown
- Boba U4 / Holy Pandas
* As an Amazon Associate I earn from qualifying purchases.
The Budget Toolkit: What You Actually Need
You don't need an expensive setup to lube switches professionally. A switch opener is the only non-optional tool — opening switches by hand with a flathead screwdriver risks snapping the plastic housing clips. A small paintbrush (size 00 or 000) from any art supply or dollar store works perfectly. A keycap puller and switch puller are useful if your keyboard isn't hot-swappable. A small container or plate holds the lube while you work. Total cost remains very low, especially if you already own tweezers.
All-in-One Switch Opener & Lube Station Kit (~$5 – $18)
Essential Toolkit
A complete modding starter kit containing a metal 2-in-1 switch opener (compatible with both MX and Kailh box switch latches), a 4-prong stem holder pick, precision tweezers, fine lubrication brushes, and a keycap/switch puller tool.
Includes:
- 2-in-1 metal switch opener (MX and Box)
- 4-prong stem holder & fine lube brushes
- Keycap puller & switch removal tongs
* As an Amazon Associate I earn from qualifying purchases.
Step-by-Step: How to Lube Switches Correctly
1Remove Switches from the Keyboard
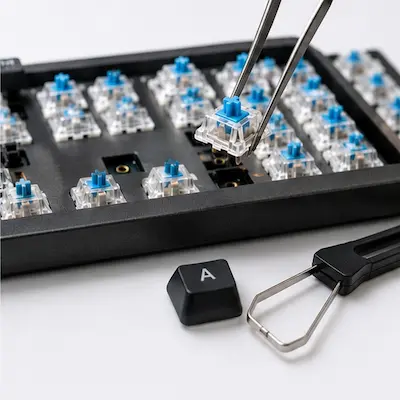
If your keyboard is hot-swap, use a switch puller to pop each switch out from the top without touching the PCB pins. For soldered keyboards, you'll need to desolder each switch — a budget-friendly desoldering pump is sufficient for this job. Remove all keycaps first with a keycap puller. Work in batches of 20–30 switches to keep your session manageable.
Never yank switches out of a hot-swap socket with your fingers — misaligned bent pins will damage the hot-swap socket permanently, and replacements require soldering.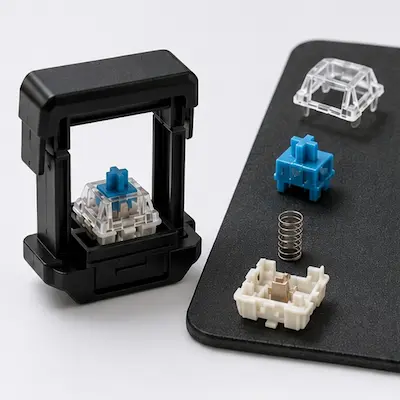
2Open Each Switch with a Switch Opener
Place the switch top-down into the switch opener and press firmly — the four clips release simultaneously and the top housing pops off cleanly. You'll have four components: top housing, bottom housing, stem, and spring. Organize them on a flat surface or in a tray. Work through 10–15 switches before starting to lube so you have a small batch ready.
3Apply Lube to the Bottom Housing Rails
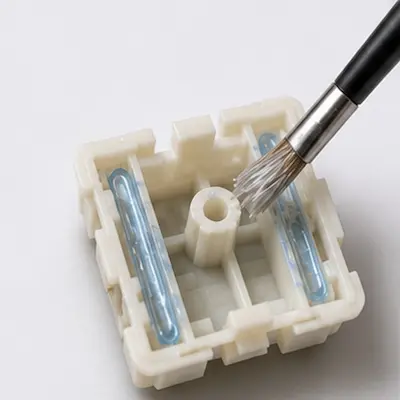
Dip your brush lightly — less is always more. Wipe excess lube off on the rim of the container so the brush is barely coated. Paint a thin, even coat on the two inner rails inside the bottom housing (the vertical channels where the stem legs slide). Also apply a light coat to the cylindrical stem post in the center. The goal is a translucent film, not a thick glob. Over-lubing makes the switch feel mushy and inconsistent.
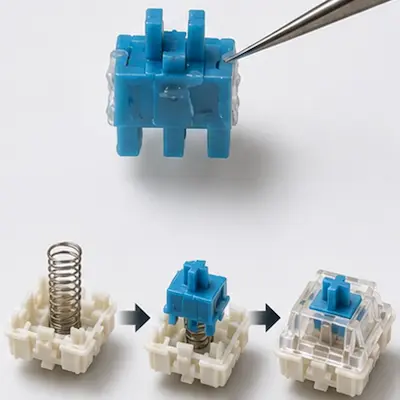
Never lube the tactile legs on tactile switches. Those are the two small protrusions on the bottom of the stem — lubricating them is the number one mistake that kills the tactile bump and turns your Brown into a mushy linear.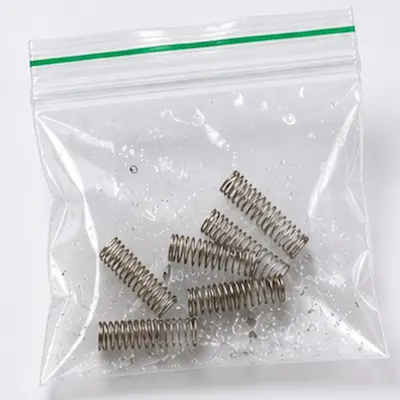
4Bag-Lube the Springs
Spring ping is the most annoying sound in stock keyboards. Drop all your springs into a small zip-lock bag, add a tiny amount of lube (about the size of a grain of rice), seal the bag, and shake it for 30 seconds. Every spring gets an ultra-thin, uniform coat without any tedious individual brushing. This single step eliminates spring ping on every switch at once.
5Lube the Stem and Reassemble
Apply a thin coat to the four sides of the stem body — the parts that contact the housing rails during travel. Drop the spring back into the bottom housing, place the lubed stem on top, and press the top housing down until you hear a firm click from all four clips. The switch should feel noticeably smoother even when pressed by hand before reinstalling.
What Lubed Switches Actually Feel and Sound Like
Zero Scratch, Pure Smoothness
The mechanical friction between stem and housing rails disappears completely. Each keystroke travels in a single, uninterrupted glide from top to bottom — no grit, no dragging, no roughness at any point in the travel. The difference between lubed and unlubed switches is immediately obvious to anyone who touches the keyboard, even non-enthusiasts.
Spring Ping Eliminated
That metallic 'ping' or 'sproing' sound on fast typing is caused by the dry spring vibrating against the switch housing. The bag-lube technique completely silences it — every keystroke produces a clean, consistent thud with no metallic overtone, which also dramatically improves the sound when recorded or used in meetings.
Dramatically Improved Sound Profile
Lubed linears on a tape-modded PCB produce the famous 'thocky' sound signature that keyboard enthusiasts spend significant amounts chasing. Combined with the Tape Mod, your total investment remains extremely low for a keyboard that sounds and feels premium — a transformation that would cost much more from a custom keyboard manufacturer.
Frequently Asked Questions
You can, but it's not recommended and requires extra caution. Clicky switches have a click jacket mechanism — a small plastic component that creates the audible click. Applying lube to it muffles or completely removes the click, turning your Blue into a scratchy tactile. If you want to lube clicky switches, only apply a thin coat of 3204 to the housing rails, avoiding the click jacket entirely. Most enthusiasts simply don't lube clicky switches.
The correct amount is a translucent film — you should still be able to see the plastic surface beneath. Signs of over-lubing: the switch feels mushy or slow to return, inconsistent feel between presses, or lube visibly pooling inside the housing. If you over-lube, disassemble the switch, wipe components clean with isopropyl alcohol, let them dry completely for 5 minutes, and reapply with a lighter hand.
For most budget linears, lubing the bottom housing rails and stem is sufficient. The top housing primarily makes contact at the very top of the travel, which is a short range. Lubing the top housing adds marginal benefit on linears and zero benefit on tactiles. Focus your effort on the bottom rails and stem sides — that's where 90% of the friction occurs.
A properly lubed switch lasts 1–3 years of daily use before the lube migrates or dries enough to feel a difference. When it starts feeling slightly scratchy again, you can disassemble and re-lube without replacing any components. A single bottle of Krytox 205g0 contains enough lubricant to lube 3–5 full keyboards, making re-lubing essentially free for years.
Absolutely — it's even more impactful on budget keyboards than on expensive ones. Premium high-end keyboards often ship with factory-lubed switches, meaning they feel smooth by default. A scratchy budget keyboard with a proper lube job frequently outperforms a stock mid-range board in feel and sound. Combined with the Tape Mod, it's the highest return-on-investment modification in the entire hobby.
You May Also Like
- The Ultimate PE Foam Mod: Creamy Keyboard Sound on a Budget
- How to Overclock Your Monitor from 60 Hz to 75+ Hz Using CRU
- Best Ultra-Budget Gaming Keyboards Under $20 for CS2 & Valorant (2026) — 4 Contenders, 1 Clear Winner
- Best Ultra-Budget Rapid Trigger Keyboards Under $40 for CS2 & Valorant (2026)
- Best Ultra-Budget Wireless Keyboards Under $20: CS2 & Valorant